Crafting a homemade gingerbread house is a beloved holiday tradition, bringing joy and a touch of magic to any home. This guide makes the process fun and easy, even for beginners. Our beginner-friendly Gingerbread House Recipe makes it simpler than ever. Follow along with our clear instructions and a free printable template to build a stunning edible masterpiece that everyone will adore.
Why You’ll Love This Gingerbread House Recipe
- Sturdy & Reliable Dough: This specially designed dough holds its shape perfectly, ensuring a strong foundation for your house.
To understand the engineering behind edible structures, MIT offers insights into the science of gingerbread house construction.
- Clear Instructions: We break down every step, making construction straightforward and stress-free for first-time builders.
- Family Tradition: Building a gingerbread house creates cherished holiday memories and a wonderful annual activity for all ages.
- Deliciously Spiced: Enjoy a fragrant, edible gingerbread house (for a few days!) with classic warm spices.
- Beginner-Friendly: With a comprehensive video tutorial and template, this sturdy gingerbread house recipe is perfect for beginners.


Homemade Gingerbread House
Equipment
- Mixing Bowl
- Rolling Pin
- Baking Sheets
- Parchment Paper
- Knife or Template
Ingredients
Gingerbread Dough
- 6 cups all-purpose flour
- 1 cup unsalted butter softened
- 1 cup brown sugar packed
- 1 1/4 cups molasses unsulphured
- 2 eggs
- 1 tbsp ground ginger
- 1 tbsp ground cinnamon
- 1/2 tsp ground cloves
- 1/2 tsp salt
- 1 tbsp baking soda
Instructions
- In a bowl, cream butter and sugar. Add eggs and molasses. Mix until combined.
- In another bowl, whisk together flour, baking soda, salt, and spices. Gradually add to wet ingredients to form a firm dough.
- Divide dough, roll out, and cut shapes using templates. Place on baking sheets lined with parchment paper.
- Bake at 350°F (175°C) for 12–15 minutes. Cool completely before assembling.
- Use royal icing to assemble and decorate the house. Let dry completely before moving.
Notes
Nutrition
Ingredients
Ready to gather the essentials for your perfect gingerbread house recipe? The right ingredients ensure a sturdy, delicious house. For assembling and decorating, you’ll use royal icing as your sturdy “glue” and a crusting buttercream for beautiful, pipeable details. Gather an assortment of colorful candies to bring your vision to life!
For the Gingerbread Dough:
- 3 cups (375g) all-purpose flour (spooned & leveled)
- 1/4 teaspoon baking soda
- 2 teaspoons ground ginger
- 2 teaspoons ground cinnamon
- 1/2 teaspoon ground allspice
- 1/4 teaspoon salt
- 6 Tablespoons (85g) unsalted butter, softened to room temperature
- 3/4 cup (150g) packed light or dark brown sugar
- 1 large egg, at room temperature
- 1/2 cup (120ml) unsulphured or dark molasses (do not use blackstrap; I prefer Grandmas brand)
- 1 Tablespoon (15ml) water
For the Royal Icing (the “glue”):
- Refer to a separate royal icing recipe for precise quantities.
For the Crusting Buttercream:
- 1/2 cup (95g) shortening, at room temperature
- 1/2 cup (8 Tbsp; 113g) unsalted butter, softened to room temperature
- 4 cups (480g) confectioners sugar
- 2 Tablespoons (30ml) milk
- 1/4 teaspoon pure vanilla extract
- 1/8 teaspoon salt
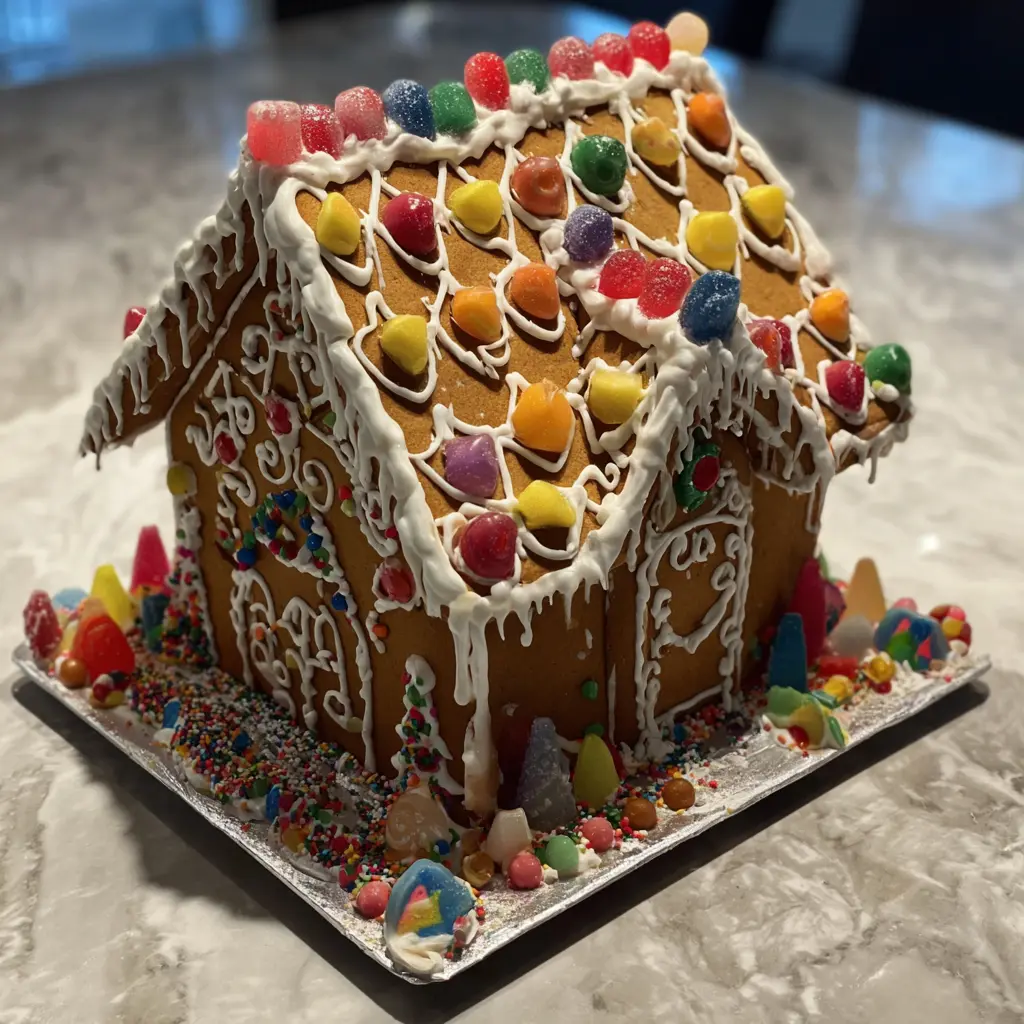
Assorted Candies for Decorating:
- Gumdrops, M&Ms, candy canes (mini or regular)
- Peppermint swirl candies
- Sprinkles (holiday mix)
- Edible metallic beads/dragees
- Marshmallows, coconut flakes (“snow”)
- Cinnamon sticks, Hershey’s Kisses, chocolate chips, cereal pieces
- Icing decorations (snowflakes, holly)
Notes & Substitutions
Use unsulphured or dark molasses for the best flavor; blackstrap molasses is too bitter. For more information on the different varieties and their uses, see this guide on types of molasses in baking.
For a firm buttercream that holds its shape, use a mix of shortening and butter. You can adjust the ground ginger and cinnamon to your taste if you prefer a milder or stronger spice profile in your gingerbread dough. Always spoon and level flour into measuring cups to ensure accuracy.
Equipment
Having the right tools makes building your gingerbread house much smoother. You will need a good template and standard baking gear. For the intricate details, a few piping tools will be incredibly helpful.
- Gingerbread house template (printable)
- Large mixing bowls
- Handheld or stand mixer
- Parchment paper or silicone baking mats
- Baking sheets
- Rolling pin
- Pizza cutter or small knife
- Wooden cake server (or sturdy base)
- Squeeze bottle (for royal icing)
- Piping bags (reusable or disposable)
- Ateco piping tip #32 (small open star)
Instructions
Follow these step-by-step instructions to build your beautiful gingerbread house recipe creation. Refer to the accompanying video for visual guidance throughout the process, especially during dough rolling and assembly.
- Prepare Template: Print out my Sallys Baking Recipes Gingerbread House Template and carefully cut out all the shapes. You will need two of each shape for the main house. Set these aside for cutting your dough.
- Make Gingerbread Dough: Dry Ingredients. In a large bowl, whisk together the flour, baking soda, ground ginger, ground cinnamon, ground allspice, and salt. Ensure they are well combined. Set this dry mixture aside.
- Make Gingerbread Dough: Wet Ingredients. In a separate large bowl, using a handheld or stand mixer with a paddle attachment, beat the softened butter and brown sugar on medium speed. Continue beating for about 2 minutes until the mixture is completely smooth and creamy. Next, beat in the egg, molasses, and water on high speed until thoroughly combined. Scrape down the sides and bottom of the bowl as needed to ensure everything is incorporated.
- Combine & Chill Dough. On low speed, gradually add the dry ingredients into the wet ingredients, mixing until just combined. The resulting cookie dough will be very thick. Divide the dough in half, flattening each portion into a disc about 4-5 inches in diameter. Wrap each disc tightly in plastic wrap and chill in the refrigerator for a minimum of 2 hours, or up to 3 days. Chilling is essential for a stable gingerbread house structure.
- Cut Shapes. Preheat your oven to 350°F (177°C). Line 2-3 large baking sheets with parchment paper or silicone baking mats. Remove one dough disc from the refrigerator. Roll it out between two pieces of parchment paper to prevent sticking, aiming for a consistent 1/4-inch thickness. This thickness is crucial for sturdy house pieces. Lightly flour the underside of your gingerbread house template shapes to prevent them from sticking to the dough. Using a pizza cutter or small knife, carefully cut the dough into the template shapes. You need two of each main shape. Re-roll any dough scraps to cut out additional pieces or fun decorative shapes.
- Bake & Cool. Carefully transfer the cut gingerbread house shapes onto the prepared baking sheets, leaving about 3 inches between them. If any shapes lost their form during transfer, gently straighten their edges. Bake the main house pieces for approximately 18-20 minutes, or until the edges are lightly browned. Bake smaller chimney pieces for about 12-13 minutes. Remove from the oven and allow all the pieces to cool completely on the baking sheets or on a flat counter. A flat surface is vital to prevent the gingerbread house edges from curling. Cooled pieces can be stored airtight at room temperature for up to one week or frozen for up to three months; thaw at room temperature before use.
- Construct Base. Choose a sturdy base for your house, such as a wooden cake server or a sturdy piece of cardboard. Watch the video for a visual guide. Begin by piping a thick line of royal icing along one long edge and one short edge of a side house piece. Adhere it firmly to your base. Use household items like snack bag clips, soda cans, or tall cups to prop up and support the walls as the icing partially sets. Repeat with the front of the house piece, adhering it to the base and the already placed side. Continue this process with the second side and back piece. Apply royal icing generously inside any seams, both inside and outside the house, to fill voids. The royal icing acts as strong glue and resembles snow when dry. Allow the base to set at room temperature for at least 1 hour before adding the roof.
- Add Roof. Pipe a thick line of royal icing along the inside edges of one roof piece and carefully adhere it to the house base. Hold it firmly in place for a few minutes. Repeat with the second roof piece. Once both are positioned, pipe a thick line of royal icing along the seam where the two roof pieces meet at the top of the house. Hold them together firmly for a few minutes until the icing begins to set.
- Optional Chimney. The chimney adds a charming touch. Assemble the chimney pieces separately using thick lines of royal icing, similar to how you built the main house walls. It’s often easiest to glue the chimney pieces together upside-down. Prop the chimney as needed while its icing sets. Once set, adhere the completed chimney to the roof. Don’t worry if it doesn’t fit perfectly; use extra royal icing and cover any gaps with buttercream during decoration.
- House Must Set. Before decorating, the royal icing on the entire house must be completely set and firm. Allow the assembled house to set at room temperature for at least 3 hours, preferably 4-6 hours or even overnight. Cover and store any leftover royal icing at room temperature or in the refrigerator during this setting period; it will be your “glue” for attaching candies.
- Prepare Buttercream. The buttercream can be made up to 1 day in advance; cover it tightly and store it in the refrigerator overnight. Bring it back to room temperature before piping or decorating. Using a handheld or stand mixer with a paddle attachment, beat the shortening and butter together on medium speed for about 2 minutes until creamy. Add the confectioners’ sugar, milk, and vanilla extract. Beat on low speed for 30 seconds, then increase to high speed and beat for 3 full minutes. The frosting will be very thick, which is ideal for decorating. If it is too thick, add another splash of milk. Add a pinch of salt (about 1/8 teaspoon) if the frosting seems too sweet.
- Decorate. Now for the most fun part! Use the prepared buttercream, any leftover royal icing, and your chosen assortment of candies for decorating. Refer to the candy suggestions provided in the ingredients list. I used just one piping tip for the entire house: Ateco piping tip #32, a small open star tip. It creates a beautiful, simple design. Let your creativity soar as you transform your gingerbread house into a festive masterpiece!
Pro Tips & Troubleshooting
- Dough Rolling: Always roll your gingerbread dough between two pieces of parchment paper. This prevents sticking to your counter and rolling pin, making the process much cleaner.
- Sturdiness: Ensure you roll the dough to a consistent 1/4-inch thickness. Thicker pieces provide a much stronger and more stable gingerbread house recipe structure.
- Cooling: Cool baked gingerbread pieces on a flat surface like a baking sheet or counter. This prevents warping and ensures straight edges for easier assembly.
- Royal Icing: Use royal icing liberally as “glue.” It dries hard and white, resembling freshly fallen snow, and provides a very strong bond.
- Buttercream Choice: Crusting buttercream sets firm, making it ideal for holding decorative elements and creating detailed designs without smudging.
- Make-Ahead: You can prepare the dough, bake the pieces, and even make the icings in advance. This breaks up the project and reduces holiday stress.
- Assembly Support: Don’t hesitate to use household items like clips, cans, or glasses to prop up walls during the initial setting phase. Patience here ensures a stable house.
- Edibility: While charming for display, this gingerbread house is best eaten within a few days of assembly for optimal freshness and taste.
- Wonky Pieces: Don’t worry about minor imperfections in your baked pieces. Royal icing and assorted candies can cleverly cover any uneven edges or small cracks. Use this gingerbread house recipe as a foundation for your holiday display.
Serving, Storage & Variations
- Serving: Display your completed gingerbread house as a festive centerpiece throughout the holiday season. When you are ready to enjoy it, simply break it apart and savor the deliciously spiced gingerbread pieces.
- Storage:
- Baked pieces: Store un-assembled baked gingerbread pieces in an airtight container at room temperature or in the refrigerator for up to 1 week. They can also be frozen for up to 3 months; thaw at room temperature before use.
- Assembled house: An assembled gingerbread house recipe can be displayed at room temperature in a dry environment for several weeks. While it remains a beautiful decoration, it is best eaten within a few days of assembly.
- Decorating Variations:
- “Stained Glass” Windows: Crush hard candies, place them in cut-out window openings on your unbaked dough, and bake until melted for a translucent effect.
- Candy Types: Experiment with different candies like pretzels for fences, wafer cookies for shutters, or even mini marshmallows for a snowy landscape.
- Coconut Flakes: Sprinkle shredded coconut flakes around the base or on the roof for a realistic snow effect.
- Architectural Styles: Get creative with the template or freehand designs to create unique structures, from a cozy cottage to a charming log cabin.
Nutrition
The following nutrition facts are an estimate for a small serving portion of the gingerbread house dough, not including icing or decorations. Values may vary based on specific ingredients and brands used.
| Nutrition Facts (per serving, estimated) |
|---|
| Calories: 160 |
| Total Fat: 6g |
| Saturated Fat: 3g |
| Cholesterol: 20mg |
| Sodium: 90mg |
| Total Carbohydrates: 25g |
| Dietary Fiber: 1g |
| Total Sugars: 12g |
| Protein: 2g |
Conclusion
Building this Gingerbread House Recipe is truly a magical experience, bringing warmth and festive cheer into your home. This project, from baking the spiced gingerbread to artfully decorating with candies and icing, creates lasting memories. Embrace the creative process, enjoy the time spent with loved ones, and don’t worry about perfection. Every homemade gingerbread house is unique and special. We invite you to share your beautiful creations!
FAQ
Can I use this recipe for gingerbread cookies?
This dough is specifically formulated for structural integrity. For softer, chewier gingerbread cookies, use a dedicated gingerbread cookie recipe for the best results.
How long does a gingerbread house last?
A gingerbread house is edible for a few days after assembly. You can display it as a beautiful decoration for several weeks if stored in a cool, dry environment.
Can I use chocolate to glue the house together?
Melted chocolate can work as an adhesive, but royal icing offers a much stronger, more traditional, and reliable hold that dries hard and firm.
My dough is crumbly, what went wrong?
Ensure you accurately measure your flour by spooning it into the measuring cup and leveling it. Too much flour can make the dough dry and crumbly.
Can I double the recipe?
Yes, doubling this gingerbread house recipe is generally fine. You can also make separate batches if you prefer to manage the dough in smaller quantities.
Can I use silicone gingerbread house molds?
This specific recipe has not been tested with silicone molds. While the sturdy dough might work, ensure proper baking times and cooling to maintain its structural integrity.


