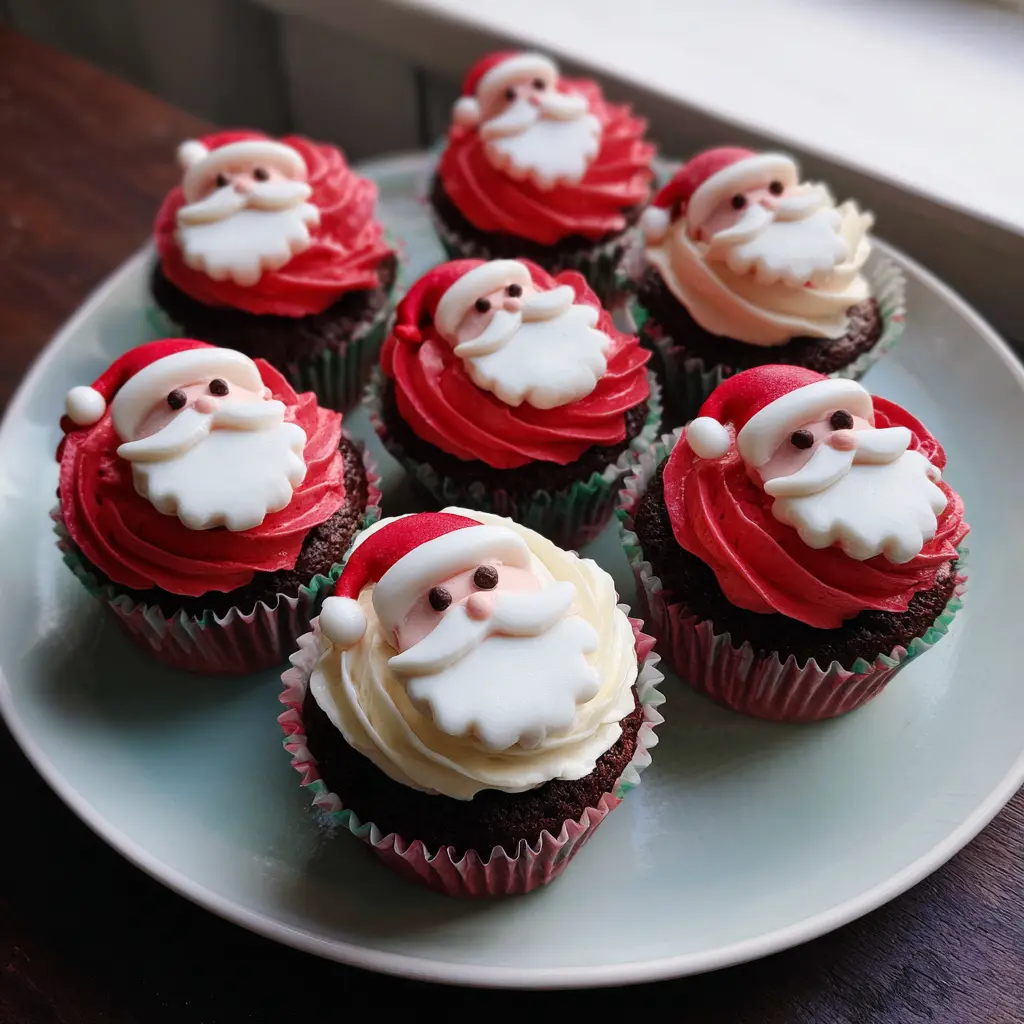
Welcome to the magic of holiday baking! This season, create joy with our adorable Santa Cupcakes. They are the perfect festive treat to share with loved ones. We’ll guide you through making these impressive little delights with ease. Get ready to bake some unforgettable holiday memories!
Why You’ll Love These Santa Cupcakes
- Effortlessly Festive and Fun: These Santa Cupcakes bring instant cheer to any gathering.
- No Complicated Fondant Needed: We use simple piping techniques for an impressive finish.
- Rich Chocolate and Creamy Buttercream: A classic flavor combination everyone adores.
- Perfect for All Skill Levels: Our step-by-step guide makes them beginner-friendly.
- Delight Kids and Adults Alike: Their charming design is irresistible to all ages.
Ingredients
Gather your kitchen essentials for these delightful Santa Cupcakes. We use simple ingredients to create a rich chocolate cupcake base and a luscious vanilla buttercream. This recipe yields 16 cupcakes, perfect for sharing holiday cheer!
For the Chocolate Cupcakes:
- ¼ cup (57g) sour cream (room temperature)
- ½ cup (118mL) buttermilk (room temperature)
- 2 medium eggs
- ¼ cup (60mL) hot coffee
- ⅓ cup (79mL) vegetable oil
- 2 tsp (10mL) vanilla extract
- 1 ½ cups (180g) all-purpose flour
- 1 ⅓ cup (265g) granulated sugar
- ¼ cup (20g) cocoa powder (nice quality)
- 1 tsp (6g) baking soda
- ½ tsp (2.5g) kosher salt
For the Vanilla Buttercream:
- 1 lb (450g) unsalted butter (room temperature)
- 1 2/3 lbs (700g) confectioners’ sugar
- 1 tsp (5mL) vanilla extract
- 1 tbsp (15mL) whole milk
- ½ tsp (2g) kosher salt
- Red, flesh-toned gel food coloring
Notes & Substitutions
- Sour cream/yogurt: Adds moisture and tenderness. Greek yogurt works as a great substitute.
- Buttermilk: Creates a tender crumb. Combine 1/2 cup milk with 1/2 tbsp lemon juice or vinegar and let sit for 5 minutes if you don’t have buttermilk.
- Hot coffee: Deepens the chocolate flavor without making the cupcakes taste like coffee.
- Cocoa powder: Use Dutch-processed for a darker color and milder flavor, or natural for a classic chocolate taste.
- Butter: Room temperature butter is crucial for smooth, lump-free buttercream.
- Food coloring: Gel food coloring provides vibrant color without thinning your frosting.


Festive Santa Cupcakes
Equipment
- Cupcake Pan
- Mixing Bowls
- Piping Bags
Ingredients
Cupcakes
- 1 box red velvet cake mix plus ingredients listed on the box
Buttercream Frosting
- 1 cup unsalted butter softened
- 4 cups powdered sugar sifted
- 2 tbsp milk or cream
- 1 tsp vanilla extract
- red and white food coloring gel preferred
Instructions
- Preheat oven and prepare red velvet cupcake batter according to package instructions. Divide into cupcake liners and bake. Let cool completely.
- To make the buttercream, beat softened butter until creamy. Gradually add powdered sugar, milk, and vanilla until smooth and fluffy.
- Divide frosting into two portions. Tint one portion red and leave the other white. Fill piping bags with each.
- Decorate each cupcake with Santa face designs — use white for beard and trim, and red for hat. Add mini chocolate chips or candies for eyes and nose if desired.
- Refrigerate briefly to set decorations before serving.
Notes
Nutrition
Equipment
You only need a few basic tools to make these charming Santa Cupcakes.
- Standard 12-cup muffin tin
- Cupcake liners (16 total)
- Electric mixer (stand or hand mixer)
- Large mixing bowls
- Rubber spatula
- Piping bags (disposable or reusable)
- Piping tips: large round tip (like Wilton 1A) and a medium star tip (like Wilton 21 or 32)
- Small bowls for coloring frosting
Instructions
Let’s get baking! Follow these simple steps to create your delicious Santa Cupcakes. This recipe guides you from mixing to decorating, ensuring perfect results every time.
For the Chocolate Cupcakes
- Prepare Oven and Liners: Preheat your oven to 350°F (175°C). Line a 12-cup muffin tin with paper liners. You will need a total of 16 liners for this recipe.
- Sift and Whisk Dry Ingredients: In a large bowl, sift together the all-purpose flour, granulated sugar, cocoa powder, baking soda, and kosher salt. Whisk these dry ingredients well to combine them thoroughly.
- Combine Wet Ingredients Separately: In a separate medium bowl, whisk together the sour cream, buttermilk, eggs, hot coffee, vegetable oil, and vanilla extract until smooth.
- Gently Mix Wet into Dry: Pour the wet ingredient mixture into the dry ingredients. Mix on low speed with an electric mixer, or by hand with a spatula, until just combined. Do not overmix; a few small lumps are fine.
- Fill Liners and Bake: Divide the batter evenly among the 16 prepared cupcake liners, filling each about two-thirds full. Bake for 18-22 minutes, or until a wooden skewer inserted into the center comes out clean.
- Cool Completely: Remove the cupcakes from the oven and let them cool in the muffin tin for 5 minutes. Transfer them to a wire rack to cool completely before you begin decorating them into festive Santa Cupcakes.
For the Vanilla Buttercream
- Whip Butter: In a large bowl with an electric mixer, beat the room temperature unsalted butter on medium-high speed for 3-5 minutes until it is light and fluffy.
- Gradually Add Confectioners’ Sugar: With the mixer on low, gradually add the sifted confectioners’ sugar, one cup at a time. Once incorporated, increase speed to medium and beat until fully combined and smooth.
- Mix in Flavorings: Add the vanilla extract, whole milk, and kosher salt. Beat on medium-high speed for another 2-3 minutes until the buttercream is very light, fluffy, and smooth.
- Divide and Color Frosting: Divide the buttercream into three separate bowls.
- Leave about half of the frosting white for the beard and hat trim.
- Tint a smaller portion (about 1 cup) with flesh-toned gel food coloring for Santa’s face.
- Color the remaining frosting vibrant red using red gel food coloring for the hat.
- Prepare Piping Bags: Prepare piping bags by fitting one with a large round tip (e.g., Wilton 1A) for the face, and another with a medium star tip (e.g., Wilton 21 or 32) for the red hat and white details. Fill each bag with the corresponding colored frosting.
Assembling Your Santa Cupcakes
- Create Santa’s Face: Using the round tip and flesh-toned frosting, pipe a circle in the center of each cooled cupcake to form Santa’s face.
- Form the Hat: Switch to the red frosting and star tip. Pipe a cone shape above the face to create Santa’s hat, covering about two-thirds of the cupcake.
- Pipe White Trim and Pom-pom: Use the white frosting and star tip. Pipe a wavy line along the bottom edge of the red hat for the trim. Then, pipe a small star or dollop at the tip of the hat for the pom-pom.
- Add Mini Chocolate Chip Eyes: Gently press two mini chocolate chips into the flesh-toned frosting for Santa’s eyes.
- Pipe Fluffy White Beard: Using the white frosting and star tip, pipe a fluffy beard below the face, extending it to cover the lower part of the cupcake.
- Place Red M&M for the Nose: Press a small red M&M or other small round red candy onto the face for Santa’s nose.
- Optional Sanding Sugar: For extra sparkle, lightly sprinkle clear or white sanding sugar over the white frosting.
Pro Tips for Perfect Santa Cupcakes
- Perfect Frosting Consistency: If your buttercream is too stiff, add milk a teaspoon at a time. If it’s too soft, add more sifted confectioners’ sugar or chill briefly.
- Vibrant Red Coloring: Use gel food coloring for intense red. Add it gradually and let the color develop for a few minutes. You can also use a “super red” or “no-taste red” gel.
- Measuring Flour Accurately: Spoon flour into your measuring cup and then level it off with a straight edge. This prevents dense, dry cupcakes.
- Baking Evenly: Don’t overcrowd your oven. Bake one tray at a time for consistent results.
- Decorating Mistakes: Don’t worry if your first few aren’t perfect! Practice makes progress. You can always scrape off frosting and re-pipe.
- Swapping Cupcake Flavors: Feel free to use a vanilla cupcake base instead of chocolate for a different flavor profile.
- Adding Peppermint Extract: Incorporate 1/2 teaspoon of peppermint extract into the buttercream for a festive minty twist.
Serving, Storage, & Variations
These Santa Cupcakes are a festive highlight, whether enjoyed immediately or saved for later.
Serving Suggestions
- Display your finished cupcakes on a tiered stand or a festive holiday platter.
- Pair them with a mug of hot cocoa, warm spiced cider, or a cold glass of milk for the ultimate treat.
- They are ideal for holiday parties, school events, office potlucks, or as a thoughtful homemade gift.
Storage Instructions
- Store decorated cupcakes in an airtight container at room temperature for up to 2-3 days.
- If your kitchen is warm, refrigerate the cupcakes. Bring them back to room temperature for 30 minutes before serving.
- You can freeze unfrosted cupcakes for up to 2 months. Thaw, then frost. Freezing decorated cupcakes might slightly alter the texture of the frosting.
Creative Variations
- Different Cupcake Bases: Try red velvet cupcakes for a vibrant base, or even gingerbread cupcakes for a spiced flavor.
- Alternative Hat Designs: Pipe a simpler red swirl for the hat, or use sprinkles for a quick decorative touch.
- Simple Sprinkle Decorations: Use edible glitter or festive sprinkles on the white trim for added sparkle.
- Using Different Candy: Use mini chocolate chips or sprinkles for eyes, or a small jelly bean for the nose.
Nutrition Information
These delicious Santa Cupcakes are a holiday indulgence. Each cupcake provides approximately 550 calories, 25g fat, 80g carbohydrates, and 4g protein. Remember, these are meant to be a special treat, perfect for celebrating the season.
| Nutrient | Amount Per Serving |
|---|---|
| Calories | 550 |
| Total Fat | 25g |
| Saturated Fat | 15g |
| Cholesterol | 70mg |
| Sodium | 250mg |
| Total Carbohydrates | 80g |
| Dietary Fiber | 1g |
| Total Sugars | 60g |
| Protein | 4g |
Approximate values based on a serving size of 1 cupcake. Nutritional information may vary depending on ingredients and specific brands used.
Conclusion
You’ve now mastered making these charming and delicious Santa Cupcakes! They are truly a delightful addition to any holiday celebration. We hope you enjoyed creating these festive treats as much as we enjoyed sharing the recipe. Happy holidays and sweet baking from our kitchen to yours!
Frequently Asked Questions (FAQ)
Can I make these Santa Cupcakes ahead of time?
Yes, you can bake the cupcakes up to 2 days in advance and store them unfrosted. Prepare the buttercream a day ahead and store it in the fridge, then re-whip before decorating.
How do I achieve a bright red frosting?
Use a high-quality gel food coloring, specifically a “super red” or “no-taste red” variety. Add it gradually and allow the color to deepen over 10-15 minutes.
What if I don’t have a star piping tip?
You can use a round tip for all piping. For the white beard, you can simply spread the frosting with a small spatula for a fluffy look.
Can I use a different cupcake flavor for this design?
Absolutely! Vanilla, red velvet, or even a spiced gingerbread cupcake base would all work wonderfully with this Santa design.
What’s the best way to transport decorated cupcakes?
Use a dedicated cupcake carrier with inserts to prevent them from sliding. If you don’t have one, place them snugly in a box and drive carefully!


