Get ready to spread some serious holiday cheer with this adorable Santa Cake! Imagine a delightful almond-flavored cake, beautifully decorated with creamy buttercream to look just like Santa Claus. This recipe guides you through creating a festive centerpiece that’s as charming to look at as it is delicious to eat. It’s perfect for impressing guests and adding a magical touch to your celebrations.
Why You’ll Love This Santa Cake
This delightful Santa Cake is sure to become a holiday favorite for many reasons:
- Simple, Adorable Festive Design: You don’t need advanced skills to create this charming Santa, making it approachable for everyone.
- Delicious Almond Cake Layers: Moist and flavorful almond cake provides a perfect base for the rich buttercream.
- Perfect for Holiday Celebrations: It’s an ideal showstopper for Christmas parties, family gatherings, or a special holiday dessert.
- Fun for All Skill Levels: Our step-by-step instructions ensure even beginners can achieve a beautiful result.
- Customizable Colors and Flavors: Easily adapt the cake and frosting to suit your preferences or dietary needs.
Ingredients
Gather your ingredients at room temperature for the best results. This ensures everything mixes smoothly for a perfect Santa Cake. Experts emphasize that using room temperature ingredients is key for achieving a smooth, velvety batter and optimal cake texture.
For the White Almond Cake Layers:
- 3 cups all-purpose flour (375g)
- 3 cups granulated sugar (600g)
- 2 ½ tsp baking powder (10g)
- 1 tsp fine salt (6g)
- 1 cup unsalted butter, room temperature (226g)
- 1 cup carton egg whites or 7 large egg whites, room temperature (235g)
- 1 ½ cups full-fat sour cream, room temperature (380g)
- 2 Tbsp vegetable or canola oil (28g)
- 2 tsp almond extract (8g)
- 1 tsp vanilla extract or vanilla bean paste (4g)
- Red and green gel food coloring
For the Almond Buttercream Frosting:
- 2 cups unsalted butter, room temperature (452g)
- 7 cups powdered sugar (904g or a 2 lb. bag)
- ⅓ cup heavy whipping cream, room temperature (80g)
- 2 tsp almond extract (8g)
- 1 tsp vanilla extract (4g)
- Pinch of salt
- Red, ivory (skin tone), yellow, and black gel food coloring, if desired
- Optional: White sanding sugar
Notes & Substitutions
You can easily adapt this recipe to fit various dietary needs or preferences. For gluten-free flour, use a 1:1 gluten-free baking blend that includes xanthan gum. If using salted butter, reduce the added salt in the cake batter and buttercream slightly. For a vegan option, substitute butter with a high-quality vegan butter stick, egg whites with aquafaba (whipped chickpea brine), and sour cream with vegan sour cream or plain vegan yogurt. Instead of sour cream, plain Greek yogurt or buttermilk works well. If you don’t prefer almond extract, increase the vanilla extract or use a different extract like lemon. For a lighter frosting, swap some heavy cream for milk. You can also experiment with cream cheese frosting or Swiss meringue buttercream for a different texture.


Festive Santa Cake
Equipment
- Round Cake Pan
- Mixer
- Piping Bags
Ingredients
Cake
- 1 box red velvet cake mix plus ingredients listed on the box
Buttercream Frosting
- 1 cup unsalted butter softened
- 4 cups powdered sugar sifted
- 2 tbsp milk or cream
- 1 tsp vanilla extract
- red, black, and white gel food coloring for decorating
Instructions
- Prepare the red velvet cake mix according to package instructions and bake in a round cake pan. Let cool completely.
- Make the buttercream: beat butter until fluffy, then gradually mix in powdered sugar. Add milk and vanilla and beat until smooth.
- Divide frosting and tint portions red, black, and keep some white. Fill piping bags with each color.
- Frost the cake completely with white or red base, then pipe Santa’s face, beard, hat, and details using colored buttercream.
- Chill slightly before serving to help set the frosting design.
Notes
Nutrition
Equipment
Having the right tools makes baking this Santa Cake a breeze. You’ll need standard kitchen equipment along with a few specialized cake decorating items.
- Serrated knife (for leveling cakes)
- Spinning cake stand (highly recommended for easy decorating)
- Electric hand mixer or stand mixer
- Three 8-inch or 7-inch round cake pans
- Parchment paper rounds
- Rubber spatulas
- Large mixing bowls
- 8-inch greaseproof cake board
- Small offset spatula
- Thick bubble tea straw or wooden dowel (for support)
- 2 Large piping bags
- 3 Small piping bags
- 1 Open star piping tip (like a Wilton 1M)
- 2 Large round piping tips (like a Wilton 1A)
- 2 Small round piping tips (like a Wilton 10)
Instructions
Creating this festive Santa Cake is a fun and rewarding process. Follow these steps carefully for a stunning result.
White Almond Cake Layers:
- Preheat Oven & Prepare Pans: Preheat your oven to 350°F (175°C). Grease and flour three 8-inch round cake pans or two 7-inch pans. Line the bottoms with parchment paper rounds.
- Combine Dry Ingredients: In a large bowl, whisk together the all-purpose flour, granulated sugar, baking powder, and fine salt until well combined. Set aside.
- Mix in Butter: Add the softened, room temperature unsalted butter to the dry ingredients. Beat on medium-low speed with an electric mixer until the mixture resembles coarse sand, about 2-3 minutes.
- Add Wet Ingredients: In a separate medium bowl, whisk together the room temperature egg whites, full-fat sour cream, vegetable or canola oil, almond extract, and vanilla extract until smooth.
- Combine & Beat: Gradually add the wet ingredients to the dry mixture, beating on low speed until just combined. Scrape down the sides of the bowl. Increase speed to medium and beat for 2 minutes, ensuring a light and airy batter.
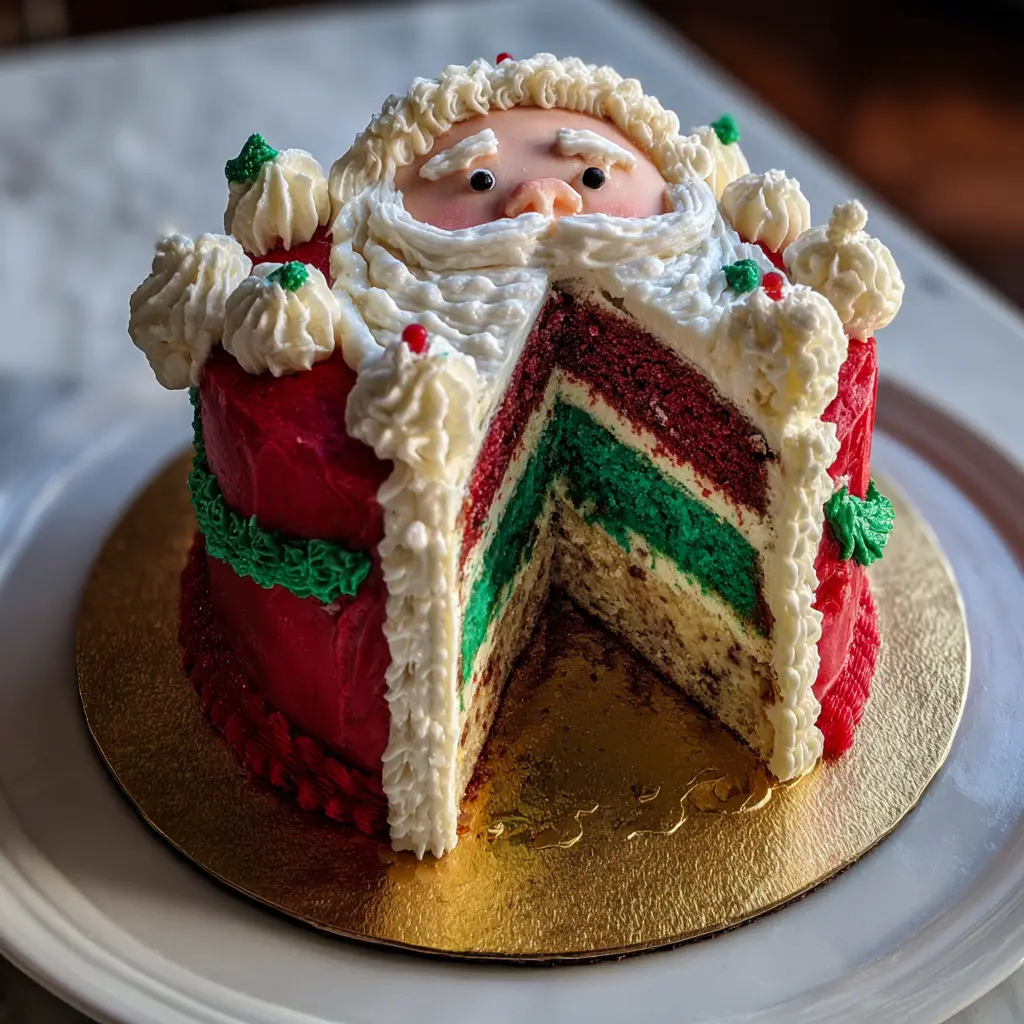
- Color Batter (Optional): Divide the batter into two portions. Color one portion with red gel food coloring and the other with green gel food coloring, if desired, for festive layers. Alternatively, keep all layers white.
- Fill Pans: Pour the batter evenly into your prepared cake pans.
- Bake Cakes: Bake for 30-35 minutes, or until a wooden skewer inserted into the center comes out clean.
- Cool & Remove: Let the cakes cool in the pans on a wire rack for 10-15 minutes. Then, invert them onto the wire rack to cool completely.
Almond Buttercream Frosting:
- Beat Butter: In a large bowl with an electric mixer, beat the room temperature unsalted butter on medium-high speed for 5 minutes until pale and fluffy.
- Add Extracts & Salt: Mix in the almond extract, vanilla extract, and a pinch of salt.
- Gradually Add Sugar & Cream: With the mixer on low speed, gradually add the powdered sugar, one cup at a time. Once combined, slowly pour in the heavy whipping cream. Increase speed to medium-high and beat for another 3-5 minutes until light and creamy.
- Adjust Consistency: If the frosting is too thick, add more cream, one tablespoon at a time. If too thin, add more powdered sugar.
Assembling This Santa Cake:
- Level Cakes: Once completely cool, use a serrated knife to level the tops of your cake layers, creating flat surfaces.
- Stack & Crumb Coat: Place one cake layer on your cake board or serving platter. Spread about ½ cup of buttercream over the top. Add the next layer and repeat. Stack the final layer. Apply a thin, even layer of buttercream all over the cake, sealing in any crumbs. This is your crumb coat.
- Chill: Refrigerate the cake for 20-30 minutes, or until the crumb coat is firm to the touch. This helps set the cake for easier decorating.
Color the Buttercream:
- Divide Frosting: Divide the remaining buttercream into several bowls.
- Large portion for red (Santa’s suit)
- Medium portion for white (beard, hat trim)
- Small portion for ivory/skin tone (face, hands, nose)
- Very small portions for black (eyes, belt, boots) and yellow (belt buckle).
- Color Frosting: Use gel food coloring to tint each portion to the desired shade. For vibrant red, use a generous amount of high-quality red gel color.
Decorating This Santa Cake:
- Red Suit: Use a small offset spatula to apply the red frosting evenly around the entire sides of the chilled cake. Smooth it out as much as possible.
- Black Belt: Fill a small piping bag fitted with a small round tip with black frosting. Pipe a horizontal line around the center of the cake’s sides, forming Santa’s belt.
- Yellow Buckle: Fill another small piping bag with yellow frosting. Pipe a small square or rectangle for the belt buckle over the black belt in the front.
- Black Feet: Pipe two semi-circle shapes at the very bottom front of the cake for Santa’s boots using black frosting and a small round tip.
- Red Arms: Pipe two diagonal lines extending from Santa’s body (the red sides) downwards towards the front, creating his arms.
- Skin-Tone Hands: Use ivory/skin-tone frosting and a small round tip to pipe small oval shapes at the end of each red arm for hands.
- Face Base: Cover the entire top surface of the cake with skin-tone frosting, smoothing it with an offset spatula. This forms Santa’s face.
- Red Hat: Using red frosting and a large round tip (or simply cut a larger opening in a piping bag), pipe a large triangular or cone shape on one side of the face for Santa’s hat. Extend it slightly beyond the cake edge.
- Hat Tip: Pipe an elongated, slightly curved tip at the top of the hat.
- White Fur Trim: Fill a piping bag with white frosting and an open star tip (Wilton 1M). Pipe swirls or stars along the bottom edge of the hat and around the hat’s tip, creating fluffy fur. Optionally, gently press white sanding sugar onto the white fur for extra sparkle.
- Facial Features: Use black frosting and a small round tip to pipe two small dots for eyes and a curved line for Santa’s mouth.
- White Beard & Mustache: With white frosting and the open star tip, pipe swirls and star shapes to create a full, fluffy beard covering the lower part of Santa’s face. Add two smaller swirls for a mustache above the mouth.
- Skin-Tone Nose: Pipe a small, rounded dot of skin-tone frosting for Santa’s nose between the eyes and mustache. Your homemade Santa Cake is now complete!
Pro Tips & Troubleshooting
Achieving a perfect Santa Cake is easier with a few expert tricks. Accurate flour measurement is crucial; spoon flour into your measuring cup then level it off. Always use room temperature ingredients for the cake batter and buttercream, as this creates a smooth, emulsified mixture. Chilling your cake layers between steps, especially after the crumb coat, makes stacking and decorating much easier and neater.
For dietary needs, many vegan and dairy-free butter substitutes perform wonderfully in both the cake and frosting. Patience is key for piping; take your time, and don’t be afraid to scrape off frosting and try again if needed. If your piping bag gets warm and the frosting becomes too soft, simply pop it in the fridge for 5-10 minutes. To achieve vibrant red buttercream, use a high-quality gel food coloring and allow the color to deepen over time.
Serving, Storage & Variations
Presenting this beautifully decorated Santa Cake is a joyous moment, perfect for holiday gatherings. Slice carefully with a warm, sharp knife for clean cuts, wiping the knife between each slice.
For short-term storage, cover the cake loosely with plastic wrap and keep it at room temperature for up to 2 days. Following proper food safety guidelines for storing baked goods helps maintain freshness and prevent spoilage. If your kitchen is warm, refrigerate the cake for up to 5 days. Bring it back to room temperature for at least an hour before serving for the best flavor and texture. For long-term preservation, you can freeze individual slices or the entire cake (without elaborate decorations) tightly wrapped in plastic wrap and then foil for up to 2-3 months. Thaw overnight in the refrigerator before serving.
Want to try a different presentation? This design can be adapted for a sheet cake or cupcakes. For a sheet cake, bake the almond cake batter in a 9×13-inch pan, then decorate the top with Santa’s face. For cupcakes, pipe red frosting swirls on half and white on the other, adding simple facial features. You can also use 6-inch cake pans for a taller, narrower Santa Cake, adjusting baking time slightly.
Nutrition
The nutritional information provided here is an estimate based on the ingredients used in this recipe. Individual results may vary depending on specific brands and exact measurements. For precise details, please refer to the comprehensive recipe card below.
| Nutrient | Amount Per Serving (approx.) |
|---|---|
| Calories | 650 kcal |
| Total Fat | 35g |
| Saturated Fat | 20g |
| Cholesterol | 90mg |
| Sodium | 250mg |
| Total Carbs | 80g |
| Dietary Fiber | 1g |
| Total Sugars | 65g |
| Protein | 5g |
Based on 24 servings.
Conclusion
Creating this festive Santa Cake is a delightful journey, transforming simple ingredients into a show-stopping holiday masterpiece. With its moist almond layers and creamy buttercream, it’s a treat that tastes as good as it looks. Don’t be intimidated by the decorating; our step-by-step guide makes it easy for any home baker to create this adorable design. So gather your ingredients and get ready to bake some holiday magic. We can’t wait to see your wonderful creations – remember to share your finished Santa Cake with us online!
FAQ
How long does Santa Cake last?
This cake stays fresh at room temperature for up to 2 days, or in the refrigerator for up to 5 days when properly covered. Always bring it to room temperature before serving for the best taste.
Can I make this cake ahead?
Absolutely! You can bake the cake layers up to 2 days in advance and store them well-wrapped. You can also make the buttercream a day ahead; just re-whip it before decorating.
What if my frosting is too soft?
If your buttercream becomes too soft for piping, chill it in the refrigerator for 15-20 minutes. Re-whip it briefly until it reaches the desired firm but spreadable consistency.
Can I use a different cake flavor?
Yes, feel free to substitute the almond cake with vanilla, chocolate, or even a spiced cake. Ensure the chosen flavor complements the rich buttercream.
Is this recipe beginner-friendly?
Yes! This Santa Cake recipe is designed with beginners in mind, offering clear, step-by-step instructions. With a little patience, anyone can create this festive treat.


